ELECTIVE MODULES 1 – 6.
E1. Organizing Your Watershed Group*
Elective
Introduction
In their "Rapid Watershed Planning Handbook" The Center for Watershed Protection* states, "[The] failure of many watershed planning and implementation studies is often termed the 'dusty shelf syndrome,' as in the watershed study that is consigned to the shelf never to be read or implemented." Two reasons cited for this are:
1. the plan lacks long term and continuous management, and
2. the plan lacks local ownership and key stakeholder involvement.
This module is designed to help you organize key stakeholder involvement.
A strong organization ensures long-term commitment to on-going watershed planning. Watershed planning is a continuous process that involves revising your watershed action plan as goals are achieved and new problems emerge. This is nearly impossible to achieve without a committed core group of individuals.
In addition, stakeholder involvement and community support is essential to long term success. Implementation of your plan is very difficult without the support of those stakeholders directly affected by your management efforts. Local ownership is important as well, to ensure buy-in and long-term commitment.
The Center for Watershed Protection identifies a core set of features that are necessary to ensure group sustainability and success in watershed planning. These core features include:
- Adequate, permanent staff to perform facilitation and administrative duties
- A consistent, long-term funding source to ensure a sustainable organization
- All stakeholders are included in planning efforts
- A core group of individuals dedicated to the project who have the support of local government agencies
- Local ownership of the watershed plan fostered throughout the process
- A process for monitoring and evaluating implementation strategies
- Open communication channels to increase cooperation between organization members
For the following exercise, you will be asked to examine the structure of a watershed organization and assess its strengths and weaknesses in light of the core features listed above. In addition, you are asked to identify opportunities for improvement.
* The Center for Watershed Protection is a nonprofit organization that "works with local, state, and federal governmental agencies, environmental consulting firms, watershed organizations, and the general public to provide objective and scientifically sound information on effective techniques to protect and restore urban watersheds" (http://www.cwp.org/).
Learning Objectives
After completion of the module the learner should be able to:
- Describe the roles of different parts of a watershed group and the roles of other organizations affiliated with that watershed group.
- Assess the strengths and weakness of a group's organizational structure and its capacity to carry out long-term watershed planning.
- Identify opportunities for enhancement of the organization to improve group sustainability and planning efforts.
Background Readings
Required:
- Four Stages and Challenges of Organizational Development by Baird Straughan, Institute for Conservation Leadership. http://www.icl.org/articles/four-stages.php
- Allison, M. & J. Kaye.
(1997) Strategic Planning for Nonprofit Organizations: A Practical Guide
and Workbook. John Wiley & Sons, Inc.
Assignments
Two options are provided for Assignment 2-1. Option A is more appropriate for watershed groups that have not yet formally organized or are just beginning to organize. Option B is more advanced and is intended for those watershed groups that have established some formal structure (e.g., Board of Directors or Steering Committee).
Assignment E1-1
Option A: For those planning to form a watershed group
For this exercise, you will be inquiring into what would be an appropriate structure for your watershed group.
Many developing watershed groups struggle with the question of what organizational structure to adopt. Should we form a Board of Directors? Should we appoint a temporary Steering Committee? Should we form committees and, if so, which ones?
As you might expect, there are no easy answers to these questions, nor is there any single right structure for any group. Most likely, the organizational structure of your group will evolve as your group evolves. This exercise will help you organize some of the information your group will need in making decisions about group structure.
The first step to completing this assignment is to identify the key individuals who will be involved in forming your watershed group. Make a list of actual and potential group members. Identify specific individuals if possible. Next, indicate their current or potential role in the group (e.g., technical knowledge, leadership skills, facilitation, official representative of a key stakeholder group).
The next step is to identify the purpose behind the formation of your group. Be as specific as possible. You may also want to describe key concerns you anticipate your watershed group will want to address (e.g., wetland preservation, promotion of agricultural BMPs, and urban stormwater runoff). Once you have identified the purpose and listed the potential concerns, review your list of stakeholders. Are you missing any key players? Consult with knowledgeable professionals or other community leaders for suggestions.
Now, describe two different organizational structures your group could adopt. Discuss the advantages and disadvantages of each model based on the information you have gathered. Again, we strongly encourage you to consult with experienced professionals to learn what options have been used in the past and advantages and disadvantages of each. You are also encouraged to discuss this assignment with members of your group and other students in the Academy through the academy listserv.
Option B: For existing watershed groups
Before you begin: You will need to have a diagram of your organizational structure to complete the following assignment. If you do not have a diagram (such as an organizational flow chart), it is highly recommended that you prepare one. This flow chart can include all parts of your organization, such as members, committees, etc. In addition, it may include all other groups and/or organizations that are affiliated with your watershed group and play a role in your planning efforts.
You may wish to complete the following assignment with members of your watershed group. Using your organizational flow chart as a guide, complete the following three tasks and write a 1-2 page summary of your results.
- Briefly describe the roles that the various components of your organization (including affiliated groups) play in your group's planning efforts. For example, Agency X has regulatory authority over land use zoning, Committee Y is responsible for volunteer recruitment, and Agency Z provides funding.
- Assess the strengths and weakness of the structure of your organization. In other words, how does the structure of you group support or hinder long-term watershed planning at the local level? In your assessment, consider the core features of successful and sustainable groups identified by the Center for Watershed Protection (listed above in the Introduction). For example, is there enough support from the local community? Is there adequate staffing and administrative?
- Identify opportunities for enhancement of your organization, such as increasing membership, expanding stakeholder involvement, etc. Consider options that will support long-term group stability and successful watershed planning and implementation.
Products to turn in for review:
Assignment E1-1
Note: You will only turn in one of the following products, depending on which option you choose to complete for this module. Please indicate at the top of your assignment which option you have selected.
- Option A: 1-2 pages with the following headings: 1) Description of the key stakeholders; 2) Group purpose; 3) Key issues and concerns; 4) Two options for structuring your group: advantages and disadvantages.
- Option B: A 1-2 page summary of an assessment of your organizational structure and the capacity of your organization to carry out long-term watershed planning.
E2. Running Effective Meetings*
Elective
Introduction
Meetings are critical opportunities for watershed group members to share information, learn from each other, and make decisions that will move the group forward. However, if meetings are not well planned or conducted, they can result in unnecessary conflict, lack of progress, and frustration on the part of group members, which can eventually affect morale and desire to participate.
While many watershed groups have a Chairperson or President who presides over group meetings, sooner or later most watershed coordinators find themselves in a position to plan or lead a meeting involving members of the public, volunteers, the Board of Directors, committees, or other groups. In those situations, you will find that good planning can make all the difference between frustration and progress.
The purpose of this module is to introduce you to a few meeting management tools and techniques. You will develop your meeting management skills by creating a detailed meeting agenda and reporting on a meeting in which you are a leader or observer.
Learning Objectives
After completion of the module the learner should be able to:
- Identify several key steps involved in planning a formal meeting.
- Identify the elements of an effective meeting.
- Develop a detailed meeting agenda.
Background Readings
Required:
- OSU Extension Factsheets on effective meetings.
[Making
Meetings Manageable]
[Planning
and Conducting Effective Public Meetings]
[Participating
in Meetings]
Assignments
Assignment E2-1
Option A:
Choose this option if you have the opportunity to lead a meeting or portion of a meeting. Otherwise, go to Option B.
- Complete the Meeting Agenda Form (download pdf). Consult with as many of the meeting participants as you can as you develop the meeting plan, especially with regard to the meeting goals, desired outcomes, and agenda items. Your chances of having a productive meeting increase greatly if the participants have agreed to the goals, outcomes, and agenda before the meeting ever begins. Be sure to leave time in the agenda to evaluate the effectiveness of the meeting with the group (see step #5 below).
- Prepare any materials you will need for your meeting (e.g., flip chart, post-it notes, etc.). Also, you will want to prepare the layout of the room to accommodate the type of activity you are facilitating (small tables for small work groups, circular arrangement for open discussion and brainstorming).
- Conduct the meeting.
- At the conclusion of your meeting, use the following questions as a guide to lead the group through an assessment of the meeting:
- Did we accomplish the goal of the meeting?
- Was everyone given sufficient opportunity to participate in discussion?
- Did we as a group stick to the agenda?
- Did the chair/facilitator of the meeting keep us on track?
- Was this a productive meeting?
- Is everyone clear on the outcomes of the meeting?
- Is everyone clear about his or her responsibilities for any follow-up to today's meeting?
- Submit your meeting agenda and a one-page summary of the results of the group assessment exercise.
Option B:
Choose this option if you will not have the opportunity to lead a meeting before this assignment is due.
- Choose a topic or issue around which you expect to be holding a meeting in the future (e.g., quarterly Board meeting; public planning session). Fill out the Meeting Agenda Form (download pdf) as completely as possible, involving key decision-makers if necessary. Be sure to identify the process (e.g., presentation, brainstorming, reporting) you will be using with each agenda item. Submit your agenda, along with the following assignment.
- Obtain permission to observe a meeting of five or more participants. As you observe, take notes, addressing the following questions:
- Is the room environment and seating arrangement comfortable and appropriate for the type of meeting being conducted? (For example, if the purpose is to encourage open discussion, group members should be seated so that they can see each other.)
- Is there a meeting agenda? What information is provided on the agenda? Is the information complete? If not, what is missing?
- What process, if any, is used to guide discussion and decision-making? (For example, many groups conduct business according to Robert's Rules of Order; others use less formal procedures.) Are the guidelines for discussion made clear to all group members?
- Is it clear who is leading the discussion? Why/Why not?
- Are the outcomes of discussion being recorded?
- Does the discussion leader keep the group on track? If so, how? If not, what is the result?
- Are the desired outcomes of each agenda item made clear to the group?
- Does the group address each agenda item completely before moving on to the next item?
- Do all participants have equal opportunity to be heard?
- After you have observed the meeting, take a few minutes to speak with one of the meeting participants to get their impressions of how the meeting was conducted and what worked or didn't work during the meeting.
- Write a one-page summary of your observations. In the concluding paragraph describe how you would plan the meeting differently if you were the group leader. Or, if you felt the meeting was highly effective, explain why. Submit your one-page summary along with your sample meeting agenda (see Option B, step #1 above).
Products to turn in for review:
Assignment E2-1
Note: You will only turn in one of the following products, depending on which option you choose to complete for this module. Please indicate at the top of your assignment which option you have selected.
- Option A: A detailed meeting agenda and a one-page summary of meeting outcomes based on a group assessment exercise.
- Option B: A detailed meeting agenda and a one-page critical analysis of a meeting you have observed. Include a summary of your observations, a description of what was effective and why, and/or a description of how you would plan the meeting differently if you were the group leader.
Meeting Agenda Form (download pdf).
E3. Group Facilitation Skills*
Elective
Introduction
In the previous module, we cover some basic meeting management skills. But getting the most out of groups sometimes requires more than just a good agenda and good meeting management skills. To increase the effectiveness of meetings, more and more groups are turning to "facilitation." Webster's dictionary defines "facilitate" as "to make easier or less difficult." All meetings -- large or small, routine or special -- need someone to orchestrate the group process.
There are two types of facilitators. Traditionally a facilitator is viewed as a neutral third party who helps the group increase its effectiveness by improving its process. This person must be acceptable to all members of the group and has no decision-making authority. The facilitator helps the group improve the way it identifies problems, solves problems and makes decisions. This person is a process expert. Typically the facilitator works with a group on a short-term basis to solve a substantive problem or develop long-range plans (i.e., strategic planning).
The second type of facilitator is the facilitative leader. A facilitative leader is a member of the group, is vested in the group and its mission, and is a process and content expert. This individual employs many of the same facilitation skills as an outside facilitator, but uses them on a routine basis to help the group permanently improve its process.
While facilitation is a complex, multifaceted process, anyone can be a facilitator. It is part art and part science, and takes time, effort and practice. Facilitation skills and effective meeting skills go hand in hand. The chair of any group should strive to be a facilitative leader. At times, the chair and/or group may decide that an outside facilitator would also be useful.
The course readings discuss two dimensions of facilitation: general facilitation skills and specific facilitation techniques. The general skills can be seen as a toolbox, giving form and substance to group process. The techniques are the tools within the box from which a facilitator picks and chooses those most appropriate for specific needs.
Listed below are some basic facilitation skills that are commonly found in a facilitator's toolbox. We have organized these skills and techniques according to your objectives (e.g., engage participants, generate ideas, or make decisions). You may find them useful for a variety of situations and settings. Detailed descriptions of each technique can be found in the readings listed in the "Sources" section.
Learning Objectives
After completion of the module the learner should be able to:
- Select appropriate group facilitation technique(s) to use in a given scenario and explain their use within the context of a meeting.
- Identify 5-10 group facilitation techniques and the advantages and disadvantages of each.
Background Readings
Required: Various--see the "Sources" list below.
Facilitation Techniques
Below you will find a list of group facilitation techniques that we have identified from various sources. Choose three from each category to learn about. The letter in the parentheses after each technique indicates which source describes the technique. [For example, (C) refers you to Group Facilitation Skills: A Toolbox for Effective Meetings.] Also, we have put an asterisk (*) by those skills we consider to be most fundamental.
Engaging Participants and Reflecting on Group Process:
This category of skills helps to assure that all participants have the
opportunity to participate in and reflect on group process. They emphasize the
responsibility of each person as a member of the group as a whole. These
techniques can be used during the beginning, middle or ending of a meeting.
- "Pop-Up" Survey* -- to help the group become a group (C)
- Numbered Heads Together* -- to engage participants mentally & check for understanding (C)
- Getting Clear & Handling Baggage -- to focus participants' attention on the group task (C)
- Corners -- to engage thinking and share perspectives (C)
- Problem Framing and Values Elicitation -- to focus what decision problem participants want to address and determine what they care about most. (F)
Generating and Sharing Information and Ideas:
This category of skills offers a variety of ways to gather information, ideas,
feelings and perspectives. In addition some provide a method for processing and
organizing the information and ideas generated. These techniques are mostly
used during the middle of a meeting.
- Sort Cards -- to engage individual thinking, sharing, and group processing of information (C)
- Brainstorming* -- to generate ideas and collect information (C)
- Small Group Brainstorming* -- to generate ideas and collect information (C)
- Think-Pair-Share* -- to engage participants in thinking and sharing (C)
- 1-2-6 -- to generate, share and discuss ideas (C)
- "Why" Technique -- to analyze and explore ideas (C)
- Cluster -- to organize ideas (C)
- Sharing Strategies and Closings -- to help participants quickly summarize important ideas (C)
- Developing Objectives -- generating ends objectives, which are important in and of themselves, and means objectives, which are a method for reaching ends objectives. (F)
Prioritizing, Making Decisions and Taking Action:
This category of skills suggests ways to act upon information and ideas that
have been processed and organized. They provide a method for making decisions
and/or prioritizing ideas.
- Decision-Making Methods* -- to determine how decisions will be made (C)
- Forced-Choice Stickers* -- to help sort, prioritize and/or make decisions about ideas (C)
- Nominal Group Technique* -- to generate and prioritize ideas (D)
- Weighted Voting -- to help sort ideas and prioritize (C)
- Consensus -- to make a decision acceptable to all (A and E)
- Force Field Analysis -- to clarify a problem and find acceptable solution(s) (D)
- Responsibility Chart* -- to clarify commitment (C)
- Action Planning Worksheet -- to map out a plan of action (D)
- Evaluating Alternatives and Tradeoffs -- developing ranking criteria to evaluate alternatives; describing consequences in order to make tradeoffs. (F)
Sources:
- General Resource: Beyond Conflict to Consensus by Bob Chadwick (Highly Recommended)
- Effective
Meeting Facilitation: The Sine Qua Non of Planning by Miranda
- Group
Facilitation Skills: A Toolbox for Effective Meetings,
- Effective
Meeting Facilitation: Sample Forms, Tools and Checklists by
Miranda
- Consensus:
Tap Into a Powerful Decision-Making Tool
by Joan Richardson.
- Gregory, R. (June 2000). Using Stakeholders Values to Make Smarter Environmental Decisions. Environment. Pages 35-43.
Assignments
Assignment E3-1:
Members of your watershed group want to plan their next meeting. Your task is to develop a "working" agenda. A working agenda is an expanded version of the meeting agenda you developed in the previous module (3. Running Effective Meetings). In fact, you may wish to begin with the agenda you developed in the previous module.
Generally, the working agenda is for your use alone and would not be handed out to meeting participants. It goes beyond just the 'Agenda Items', 'Person Responsible', and 'Time Allocated' to include, for example, facilitation strategies, how you will implement the strategies, what materials you will need, group sizes, seating arrangements, and other logistics. Your Background Readings provide many other ideas and guidelines. Submit your working agenda.
Assignment E3-2
Note: Choose only one of the following options.
Option A:
Think back on a meeting that you have attended. In terms of group facilitation, write a 1-2 page reflective paper that describes what occurred, how it went, and what, if anything, you would have done differently and why. Identify facilitation strategies that could have been used to achieve the desired meeting outcome.
Option B:
Select one group facilitation technique you've never used and try them during a watershed group meeting. (This could be the meeting you planned in assignment #4-1.) Write a 1-2 page reflective paper on what went well, what you might have done different, and when (or if) you would use the technique again. Identify other facilitation strategies that could have been used to achieve the desired meeting outcome.
Option C:
Find someone who will allow you to co-facilitate a meeting with them. In terms of facilitation, write a 1-2 page reflective paper that describes what occurred, how it went, and what (if anything) you might have done differently and why. Identify facilitation strategies that could have been used to achieve the desired meeting outcome.
Products to turn in for review:
Assignment E3-1
A detailed working agenda that describes your facilitation strategy for a meeting.
Assignment E3-2
Note: You will only turn in one of the following products, depending on which option you choose to complete for this assignment. Please indicate at the top of your assignment which option you have selected.
- Option A: A 1-2 page reflective paper on group facilitation of a meeting you have attended that includes a description of what occurred, how it went, and what if anything you would have done differently and why.
- Option B: A 1-2 page reflective paper on the facilitation techniques that you used during a watershed meeting that includes a description of what worked well, what you might have done differently, and when or if you would use these techniques again.
- Option C: A 1-2 page reflective paper on group facilitation of a meeting you have co-facilitated that includes a description of what occurred, how it went, and what if anything you would have done differently and why.
E4. Understanding the Clean Water Act.
Elective
Introduction
Exactly what is the Clean Water Act? What does it mean for watershed
planning and restoration? How do water quality standards influence the way
decisions are made for streams and lakes? These are simple questions, but
learning the answers involves some investigation. Although the Clean Water Act
itself and
This module provides a primer on the Clean Water Act, designated uses of
streams and lakes, and water quality criteria for
You may be familiar with the term “impaired streams”. The Indiana Department of
Environmental Management, with authority from the EPA as designated through the
Clean Water Act, maintains a list of impaired streams. This is known officially
as the 303(d) list of streams. Streams on the list have one or more stream
segments that have been shown to be in violation of water quality standards and
that are preventing one or more designated uses (ie.
such as human contact, fish consumption, etc.). The current framework for
improving the condition of impaired streams is part of what it known as Total
Maximum Daily Loads or TMDLs. This framework provides
a process through which IDEM, in cooperation with local communities, identifies
the specific amounts of pollutants for various stream conditions (ie. low flow, seasonal) and calculates the maximum amount
of pollutants that a stream can receive and still meet water quality standards
and designated uses. The TMDL process can be a part of, be informed by, or
itself inform watershed planning and restoration activities. IDEM monitors
streams and lakes on a large river basin schedule that rotates through a five
year cycle. New data and information for the following indicators is updated
every five years:
· Physical or chemical water results.
· Fish community assessment.
· Benthic aquatic macroinvertebrate community assessments.
· Fish tissue and surficial aquatic sediment contaminant results.
· Habitat evaluation.
· E. coli monitoring results.
Learning Objectives
After completion of the module the learner should be able to:
- Understand basic concepts behind the Clean Water Act.
- Know the different
designated uses for most water bodies in
- Know how to find out about
impaired streams in
Background Readings
Required:
- Understanding the Clean Water Act, online module from River Network: http://www.cleanwateract.org/ Click on the “Take the Course” tab at the top of the page. Read through the “Overview” and all of the “Water Quality Standards” screens (9 screens total). The other Tabs contain useful examples and information as well.
- Power Point/Video from Jane Frankenberger NEED TO PUT THIS IN YET.
- Total Maximum Daily Loads
and Impaired Streams in
Additional Resources:
- KYW TMDL Facts page. http://www.ctic.purdue.edu/KYW/tmdl/tmdlfact.html
- Understanding the Clean Water Act: A letter from Jimmy Carter. http://www.cleanwateract.org/carter.htm
- Indiana Water Quality Reports from IDEM: http://www.in.gov/idem/water/planbr/wqs/quality.html
- Water Quality Standards in Indiana Administrative Code.
- Additional Water Pollution and Water Quality in Indiana Code: http://www.state.in.us/legislative/iac/title327.html
- All About the Clean Water Act from EPA Region 5. http://www.epa.gov/region5/water/cwa.htm
Assignments
Assignment E4-1
Write
a short synopsis (one page or less) of the key points that you learned from
reading through the Overview and Water Quality Standards sections of the Understanding the Clean
Water Act course (see under required readings above). In a separate
paragraph list the five designated uses that apply to most streams in Indiana
Assignment E4-2
Download the Impaired Streams Information
Table [word
file]
(note this exercise can result in helping with your watershed inventory tasks)
Using
the Indiana Geological Survey GIS Web interface
[http://igs.indiana.edu/arcims/statewide/index.html then click on “interactive map” link at the
top of the page. Make sure that you turn off any pop-up blockers on your web
browser! Usually this option is under the Tools heading at the top of your
browser] you will conduct several investigative steps for water quality
standards in your watershed.
Once the state map opens, make sure “layers” are available in the right-hand
column. If not, click on the “layers” link in the upper left hand area of the
Web page.
Open the “Hydrology” folder, and then open the “Watersheds & Quality”
sub-folder. Select the check box next to the layer titled “Impaired Streams
(IDEM)”.
Make sure the zoom-in tool is selected (these tools are in the vertical column
between the layers and the map window) and using your mouse pointer draw a box
near where you 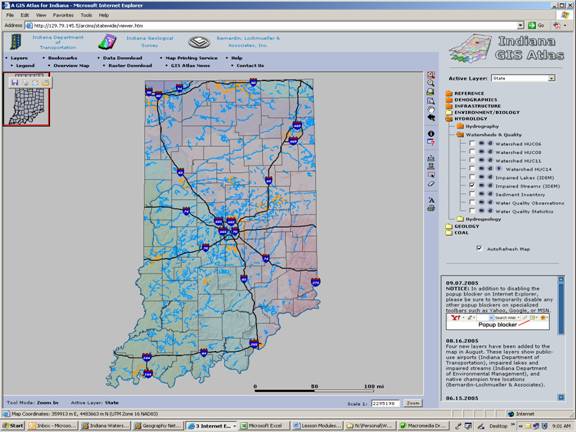 live or the watershed area where you work. The map will
zoom to this location. Are there any impaired streams shown (dotted blue
lines?). If not, then adjust the map upstream from your location until you find
an impaired stream.
live or the watershed area where you work. The map will
zoom to this location. Are there any impaired streams shown (dotted blue
lines?). If not, then adjust the map upstream from your location until you find
an impaired stream.
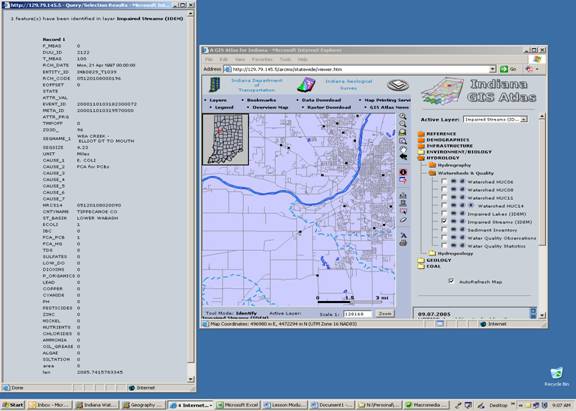
Making
sure that any pop-up blockers are turned off for your browser, select the
Identity tool (looks like a round black button with an “i”
in the center). Then, at the top of the right-hand column next to the entry
“Active Layers” and the drop-down window, select Impaired Streams as the active
layer. Once you have done this use your mouse pointer (cross-hairs) to select
directly on an impaired stream segment. A pop-up box should appear showing
several levels of information.
Using the Impaired Streams Information Table (download
the table) showing the name of the impaired stream (listed next to
Segname_1 in the pop-up box), the reach code (RCH_CODE, i.e. 05120108000196), the stream miles that
are impaired for this segment (an impaired stream may have several impaired
segments), and list the causes of impairment (CAUSE ; such as E. coli, Fish
Consumption Advisory (FCA) for PCB, etc.).
Next, on the GIS interactive map, select the layer for 11 digit watersheds
(HUC11). Then open the Environment/Biology main folder, then the Environment
sub-folder. A long list of point source pollution areas is available. Click
through this list to find out where any of these potential point sources might
be located within the watershed containing the impaired stream section.
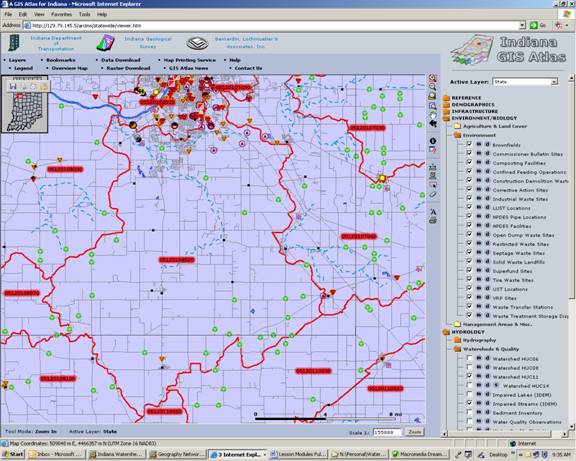 In your assignment table note how many of each type of potential point
source within the 11 digit watershed area. Also note how many are next to or
within .5 miles of the impaired stream. Choose one of these point sources near
the impaired stream. Make sure the layer that represents the point source is
selected in the Active Layer window at the top of the right hand column above
the layers (i.e., NPDES Facilities). Using the identify tool (the black circle
with an “i” ) click on the
point source, or using the select by rectangle tool (just above the
eraser/clear tool) draw a rectangle around the general area. This will bring up
a pop-up window providing some information about the point source.
In your assignment table note how many of each type of potential point
source within the 11 digit watershed area. Also note how many are next to or
within .5 miles of the impaired stream. Choose one of these point sources near
the impaired stream. Make sure the layer that represents the point source is
selected in the Active Layer window at the top of the right hand column above
the layers (i.e., NPDES Facilities). Using the identify tool (the black circle
with an “i” ) click on the
point source, or using the select by rectangle tool (just above the
eraser/clear tool) draw a rectangle around the general area. This will bring up
a pop-up window providing some information about the point source.
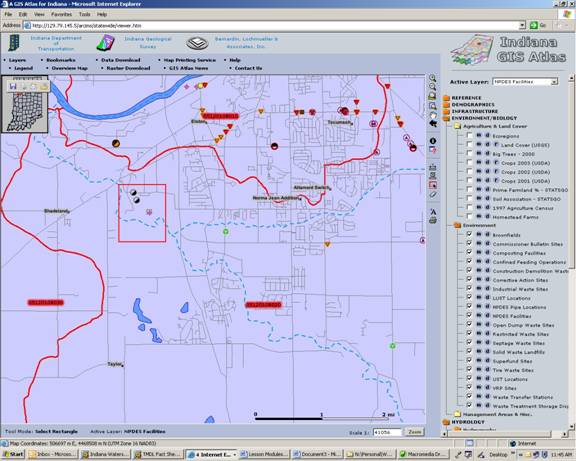
Area of the impaired
stream where an NPDES facility and NPDES pipe are selected with red rectangle
using the select by rectangle tool. Note that the Active Layer must be NPDES facilities in order to obtain
NPEDES facility information.
Close the
Environment sub-folder. Open the Agriculture & Land Cover sub-folder and
select the Land Cover (USGS) layer. Using your mouse pointer select the web
button titled “legend” in the upper left-hand portion of your Web browser. This
will display the legend on the right column next to the map.

Screen shot showing map of an impaired
stream’s 11 digit watershed area, with land use and known potential point
sources, along with the map legend.
Estimate the largest percentage of land use for the watershed (i.e., row crop
agriculture in this example – light brown – estimate 80 percent of the land
area). What types of pollution might be attributed to this particular land use?
What types of pollution might be prevented by this land use?
Products to turn in for review:
Assignment E4-1
One
page or less summary of the key points that you learned from reading through
the Overview and Water Quality Standards sections of the Understanding the Clean
Water Act course (see under required readings above). In a separate
paragraph list the five designated uses that apply to most streams in Indiana
Assignment
E4-2
Submit your Impaired Streams Information table (download
table, word file).
E5. Defining Issues & Problems in Your Watershed*
Elective
Introduction
This module will help you facilitate development of effective problem statements for your watershed.
You will build your awareness of techniques for developing shared understandings of problems - also known as social learning - and learn how to avoid some common pitfalls, such as defining the problem in terms of familiar solutions or placing unnecessary constraints on your understanding of the problem. Such pitfalls can limit the number and quality of solutions (alternatives) you investigate, thus limiting the quality of your watershed management plan.
There are three important considerations to address in a problem analysis: 1) biophysical and ecological considerations; 2) social considerations; and 3) policy and institutional considerations (Ohlson, 2003). Rather than just listing ideas under each of these headings, a problem analysis involves a focused assessment of key drivers, constraints, and issues that surround the management problem.
In this module, you may choose to expand on the water resource fact sheet developed in the "Getting to Know Your Watershed" module by examining your identified resource problems. Or you can begin with any water resource-related issue in your watershed.
Keep in mind that a problem statement should be written so that stakeholders can easily understand it. Problem statements should not include assumptions about how to address the problem. A clear problem statement developed on the best available information will enable you to develop solutions that address the causes, prioritize actions, and define how you will evaluate progress.
If possible, you should try to include problems identified in water quality studies and in discussions with stakeholders. This can be helpful for a number of reasons. First, local residents are often the best prepared to help understand problems that are occurring in their own backyard or to explain a resource's value and need for protection. Residents and stakeholders are often directly or indirectly affected by the decisions made by local watershed groups. Their concerns and 'vision' for the watershed should be included in the planning process because everyone shares a stake in the resource.
Learning Objectives
After completion of the module the learner should be able to
- Develop problem statements that are based on an in-depth analysis of biophysical and ecological, social, and policy considerations, as well as linkages to other problems.
Background Readings
Required:
- Indiana Department of
Environmental Management. (2003).
http://www.state.in.us/idem/water/planbr/wsm/iwpg/content.html - Ohlson, D. (2003). Problem Definition Primer (PDF file).
Additional Resources:
- Schusler, T.M, Decker, D., and Pfeffer, M.J. (2003). Social Learning for Collaborative Natural Resources Management, Society and Natural Resources 16(4): 309.
Assignments
Assignment E5-1
Choose a watershed-related issue to address in this exercise (e.g., nutrients, sediment, habitat destruction). Working with stakeholders, analyze the issue using the problem analysis template (Word file) and then develop a problem statement based on your analysis. The problem statement should be clear and concise so that it can be easily shared with residents and stakeholders and adapted for outreach and education.
Products to turn in for review:
Assignment E5-1
Completed problem statement and brief summary of how your problem statement evolved as a result of the problem analysis.
E6. Developing Goals and Objectives*
Elective
Introduction
Goals provide specific focus and purpose to watershed planning efforts. As defined by Ohio EPA's A Guide to Developing Local Watershed Action Plans in Ohio, a goal is "the desired change or outcome you wish to achieve and is driven by your problem statement" (p. 37). Goals can range from general to specific and short-term to long term. Goal statements should be clear, concise, measurable, motivational, and compatible with your group's mission. Whenever possible, goals should be developed with input from all relevant stakeholders so that they reflect the shared values of the community.
Objectives are specific steps that must be accomplished in order to attain your goals. One way of distinguishing objectives from goals is to ask yourself, is this an end or a means to an end? Goals are an end; objectives are a means to those ends. For example, Reducing organic enrichment is a goal (end); Educating homeowners about septic system maintenance is an objective (means to reducing organic enrichment).
For any given problem, stakeholders will likely have several goals in addition to water quality goals. For example, they may wish to minimize costs or they may be concerned about increasing community understanding about the problem. Like goals, objectives should be realistic, clear, concise, and measurable.
In this module, you will develop goals and objectives to address identified problems. In addition, you will evaluate your objectives based on how effective you believe they will be at accomplishing your goals.
Ideally, the assignments in this module would be completed with your watershed group. If this is not possible, it is still beneficial to work through the exercises to practice developing goals that relate specifically to identified problems, and to develop objectives that will lead toward accomplishing your goals.
Learning Objectives
After completion of the module the learner should be able to:
- Develop goals and objectives that address known problems and stakeholder concerns.
- Critically evaluate and refine objectives.
Background Readings
Required:
- Indiana Department of
Environmental Management. (2003).
http://www.state.in.us/idem/water/planbr/wsm/iwpg/content.html - Federal Interagency Stream Restoration Working Group. (1998). Stream Corridor Restoration: Principles, Processes, and Practices, (Section 5: Developing goals, objectives, and restoration alternatives). http://www.nrcs.usda.gov/technical/stream_restoration/PDFFILES/CHAPTER5.pdf A copy of this manual, which covers many aspects of stream restoration, can be ordered on-line at http://www.ntis.gov/products/bestsellers/stream-corridor.asp?loc=4-2-0#agencies
Additional Resources:
- Baird, A. & Bonnell, J. (2004). Multi-stakeholder Watershed Planning: Getting to Decisions that Make a Difference. Poster presented at the 4th Natural Resources Extension Professionals Conference. http://ohiowatersheds.osu.edu/structured.html
- Setting Goals from a Holistic Management Perspective. http://managingwholes.com/good-goals.htm
Assignments
Assignment E6-1
If possible, complete the following exercise with your watershed group. Choose a water quality problem that has been identified in your watershed*. If you have already completed Module 9, you may wish to refer back to the problem statement developed for Assignment 9-1.
Identify goals for the problem you have selected. The following question may help you generate goals: "What matters most to you (as a stakeholder) with regard to this problem?"
Next, identify objectives for each goal. Remember that the goal is the desired outcome and the objectives are specific steps taken to reach the goal. The following question may help you generate objectives: "How would you achieve this goal?"
Finally, try to identify specific tasks for accomplishing your objectives.
Complete the items in Table I (see example, below). Feel free to recreate this table to work through this exercise with your group.
* Note: Not all goals stem from problems. In some cases, goals may
reflect a desire to protect or enhance an existing resource, such as a valuable
natural area.
|
Table
I: Developing goals and objectives from problems. |
|
|
Problem |
Organic Enrichment |
|
Potential and / or known
sources* |
Failed septic systems (p) |
|
Related biophysical,
social, policy, and institutional considerations |
|
|
Goals |
|
|
Objectives |
|
|
Tasks |
[List specific action items that, if
completed, would have you accomplishing your objectives] |
|
*Indicate if source is
potential or known by placing a (p) for potential or (k) for known after
source. |
|
Assignment E6-2
If possible, complete the following exercise with your group or a knowledgeable group of stakeholders. Below is a table that can be used as a decision aid to evaluate and improve on your objectives.
Table II is based on the assumption that the most effective objectives have the potential to address multiple goals. Use the table as a template to create your own. Put the objectives you developed in Assignment 10-1 in the far left column and your goals (also developed in Assignment 10-1) across the top row.
Now, rate each of the objectives, based on how effective you believe that objective will be at achieving your goals. In the example below, Objective 1 (Educate septic system owners) is rated as having Low potential to reduce organic enrichment (Goal 1), but High potential to increase community understanding (Goal 3).
Table II: Evaluating Objectives |
|||
|
|
Goals |
||
|
Objectives |
Reduce organic enrichment |
Minimize costs |
Increase community understanding of problem |
|
Educate septic system
owners on how to maintain systems |
L |
H |
H |
|
Develop ordinances
requiring septic system owners to certify functioning of systems. |
M |
M |
H |
|
Update standards and
practices for siting and construction of home
septic systems |
M |
M |
H |
H = Objective has High potential to address this goal.
M = Objective has Moderate potential to address this goal.
L = Objective has Low potential to address this goal.
Once you have completed the table and rated each of your objectives, consider
what questions come up. For example, did you find it difficult to rate
some of the objectives? What information would you need to make a more
accurate rating?
Also, consider how you could modify some of your objectives to improve their rating on one or more of the goals.
Products to turn in for review:
Assignment E6-1
Completed Table I or a description of your results.
Assignment E6-2
Completed Table II. Also, explain what questions arose as you attempted to rate the objectives and describe any changes you would make to your objectives after completing the table.